
Scroll is a zkRollup based on zkEVM on Ethereum that provides native compatibility with existing Ethereum applications and tools.
Investors : The project collected $33 million investments from Polychain Capital, Bixin Ventures, Maple Leaf Capital, Santiago Santos and others.
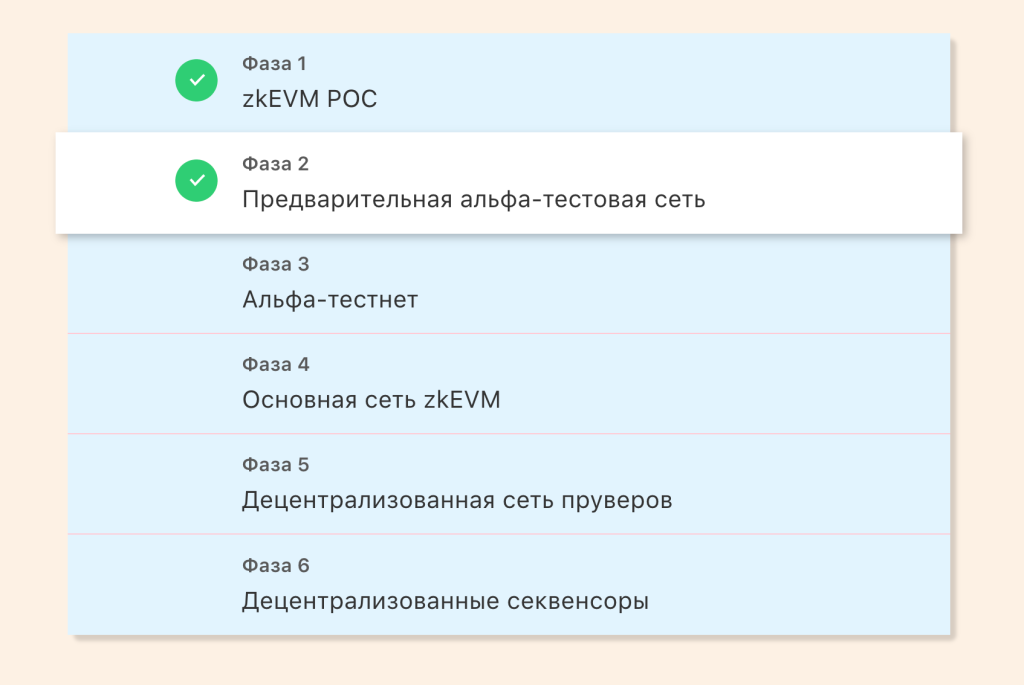
At the moment, the second phase is underway, in which everyone can participate. Many people just do an ordinary testnet and forget, but today we will do all possible activities in the hope of getting good gifts from the project.
testnet:
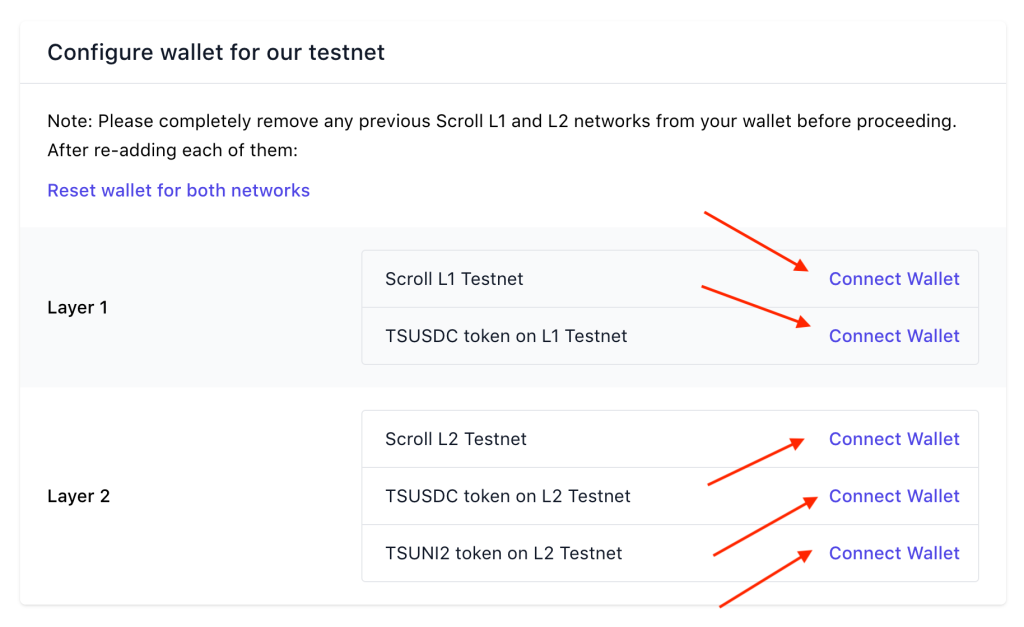
1. Go to page, connect the Metamask wallet and add both Scroll networks (L1 + L2) + all available tokens.
2. Section Faucets requesting tokens.

3. Section Bridge we transfer tokens from the L1 network to the L2 network.
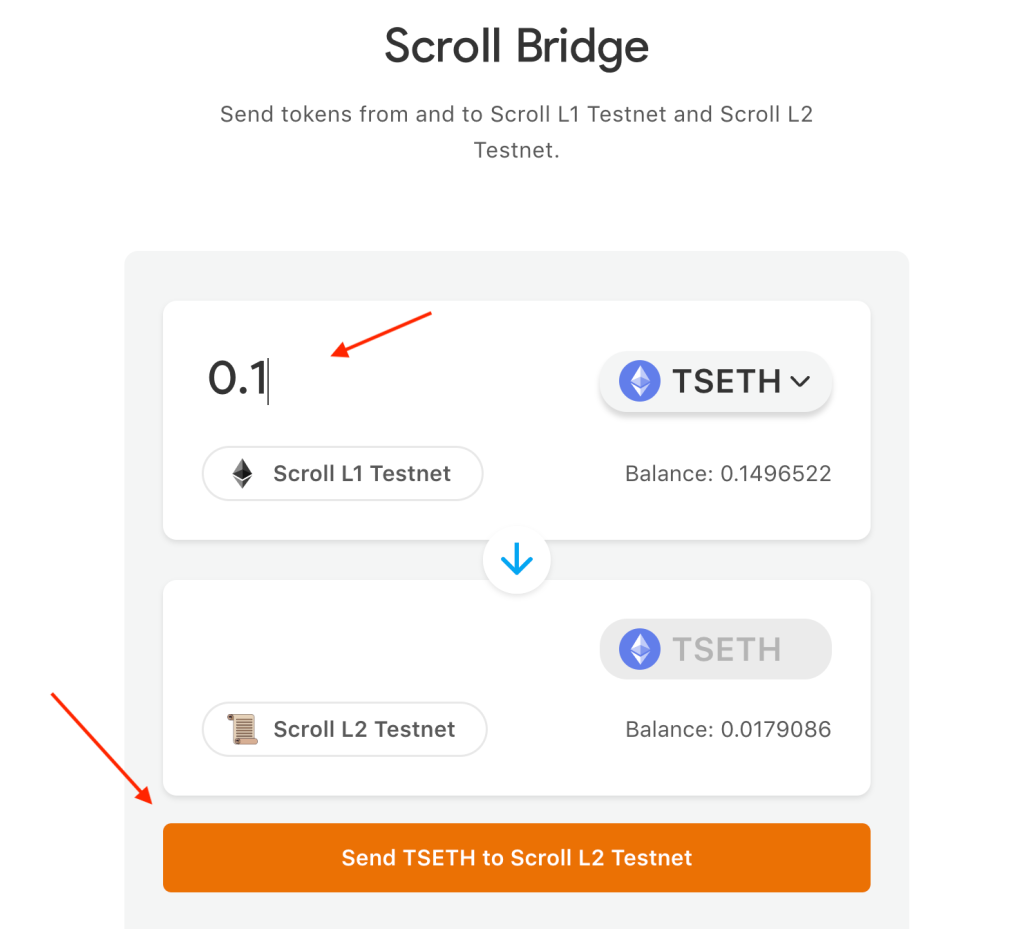
Additions: we transfer from L1 to L2 and vice versa, not only ETH, but also other tokens. But be sure to leave ETH on the L2 network for future activities.
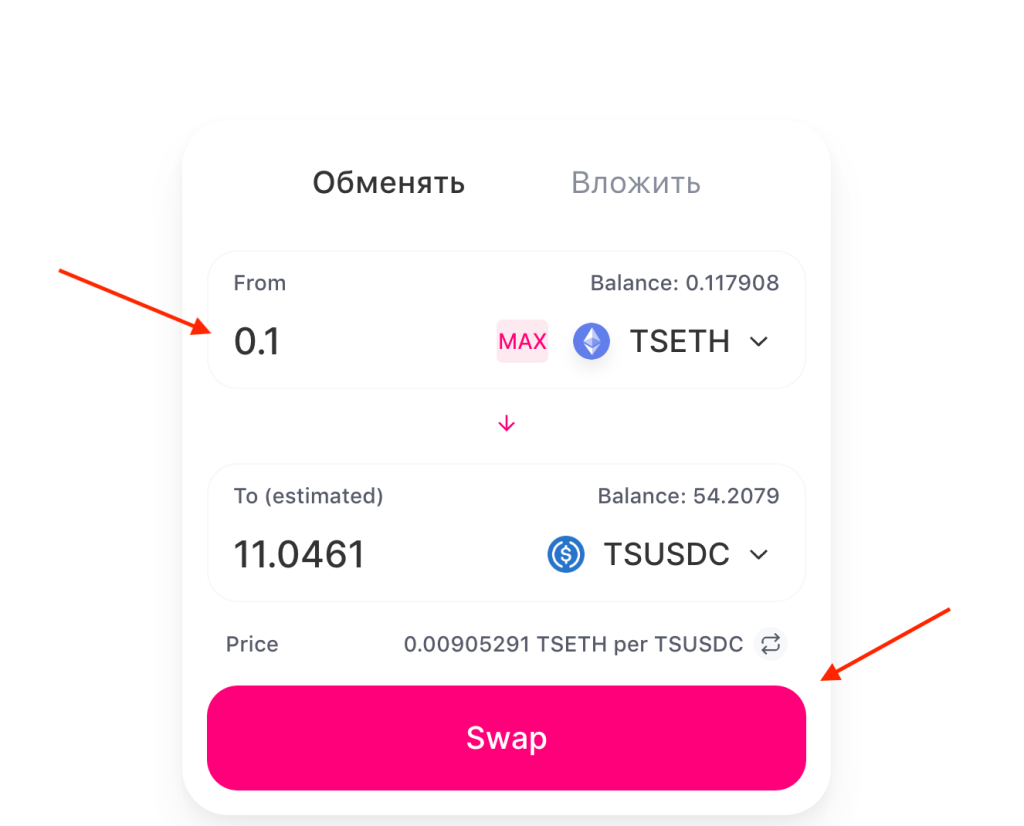
4. Go to the section swap and exchange tokens in L2 + drop them into the pool.
Additions: add liquidity + do remove.
Scroll testnet in the Uniswap interface.
All actions are repeated on this website, you are familiar with the UniSwap interface, so you will quickly do everything.
Deploy Contract
For this activity, we bought a server on Contabo (cheapest will do). If you opened a Shardeum node with us, you are familiar with this procedure.
After buying a server, go to your server and enter commands. Be sure to enter each command separately.
sudo apt update sudo apt install git git clone https://github.com/scroll-tech/scroll-contract-deploy-demo.git cd scroll-contract-deploy-demo curl -L https://foundry.paradigm.xyz | bash source /root/.bashrc foundryup forge build --use 0.8.17In the next step, we will need to copy and paste the entire block, only with our data, we will show it with our example, and you will add your data.
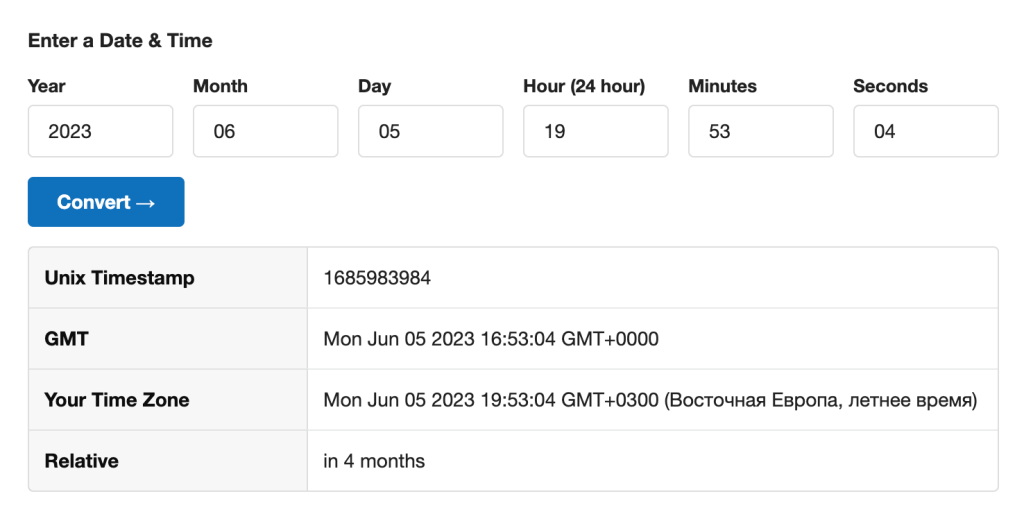
forge create --rpc-url https://prealpha-rpc.scroll.io/l2 \ --value "Ether to lock in contract" \ --constructor-args "Unlock time" \ --private-key "Your private key" \ --legacy \ contracts/Lock.sol:Lock --use 0.8.17Important: Unlock time is Unix time. You can generate time on a given website. Time needs to be written in the future: for example, 06/05/2023.
The block should look like this:
forge create --rpc-url https://prealpha-rpc.scroll.io/l2 \ --value 0.0000001ether \ --constructor-args 1685983984 \ --private-key 6d.....f925c3f1b24 \ --legacy \ contracts/Lock.sol:Lock --use 0.8.17The end result should look like this:

Copy the Deployed to field and find our contract in explorer Scroll.
This completes the Deploy Contracta. Let's move on to the next section.
Deploy Token
In this section, we will create our own token on the Scroll network. You can choose any name, we will call the token HareCrypta.
We insert each line separately! Be careful.
cd $HOME sudo apt update sudo apt install git curl -sL https://deb.nodesource.com/setup_18.x | sudo -E bash - sudo apt-get install -y nodejs mkdir DeployToken cd DeployToken sudo npm init # Press Enter until the very end. sudo npm install --save-dev hardhat sudo npx hardhat # Press Enter until the very end. (JavaScript Project) npm install --save-dev "@nomicfoundation/hardhat-toolbox@^2.0.0" npm i @openzeppelin/contracts cd contracts nano <Your Token Name>.sol # Think of a token name. Example: # nano Harecrypta.sol - An empty file should openCopy and paste into an empty file entire block of code (below), changing the data to your own. You can save the file after pasting with the combination ctrl+X, then press Y+Enter.
// SPDX-License-Identifier: MIT pragma solidity ^0.8.4; import "@openzeppelin/contracts/token/ERC20/ERC20.sol"; contract <Your Token Name> is ERC20 { constructor() ERC20("Your Token Name", "Your Token Shorthand") { _mint(msg.sender, 1000000000 * 10 ** decimals()); } }An example of our block:
// SPDX-License-Identifier: MIT pragma solidity ^0.8.4; import "@openzeppelin/contracts/token/ERC20/ERC20.sol"; contract Harecrypta is ERC20 { constructor() ERC20("Harecrypta", "HC") { _mint(msg.sender, 1000000000 * 10 ** decimals()); } }Copy the entire block of code below, an empty file should open.
cd $HOME/DeployToken/scripts rm -rf deploy.js nano deploy.jsWe open an empty file, now insert the entire block below, changing the data to our own, save with a key combination ctrl+x, then Y and Enter.
const { ethers } = require("hardhat"); async function main() { const token = await ethers.getContractFactory("YOUR TOKEN NAME"); const deployedToken = await token.deploy(); await deployedToken.deployed(); console.log(`The smart contract was deployed at: ${deployedToken.address} on Scroll L2!`); } main().catch((error) => { console.error(error); process.exitCode = 1; });In the next step, we enter the commands in order.
npm i dotenv cd $HOME/DeployToken nano .env PRIVATE_KEY="YOUR PRIVATE KEY" # Don't forget to change the key to your own # Save with ctrl+x, then Y and Enter. rm -rf hardhat.config.js nano hardhat.config.jsAfter the last command, a file is opened for us, in which we must insert the whole block (shown below) without changing anything! Save with a keyboard shortcut ctrl+x, then Y and Enter.
require("@nomicfoundation/hardhat-toolbox"); require("dotenv").config({ path: ".env" }); const PRIVATE_KEY = process.env.PRIVATE_KEY; /** @type import('hardhat/config').HardhatUserConfig */ module.exports = { solidity: "0.8.17", networks: { scrollL2: { url: `https://prealpha.scroll.io/l2 `, accounts: [PRIVATE_KEY] } } };After that, enter the last command:
npx hardhat run scripts/deploy.js --network scrollL2
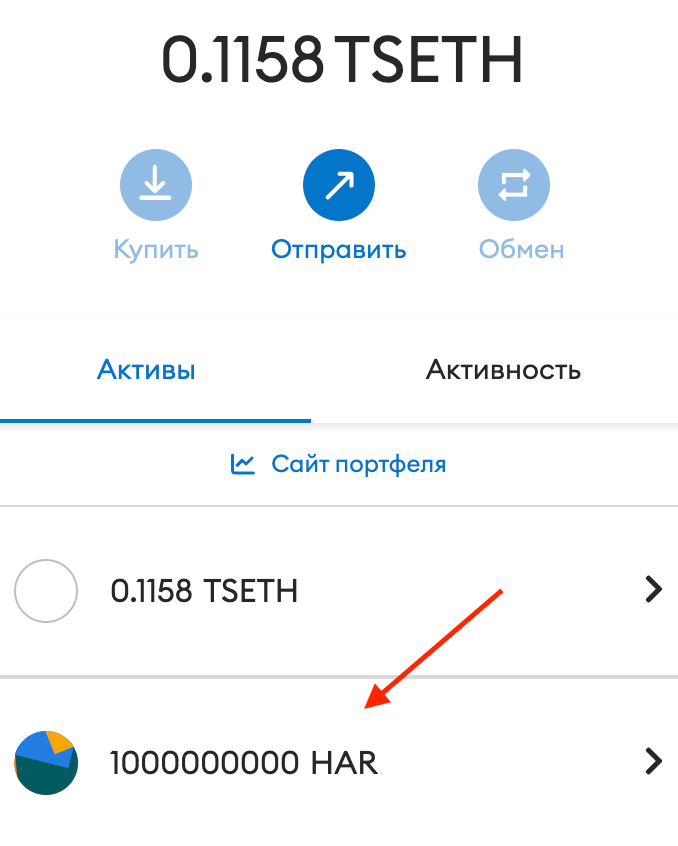
If we see such a screen, then we did everything right and get the address of the contract, which can be checked in explorer and add to your Metamask wallet.
On this we have completed all possible activities in the Scroll network. If something did not work out for you, I advise you to clear the server through cantabo and repeat all the steps.